
Pong Project Unity Package
Download our entire Pong project.
Welcome to the Info Gamer tutorial series and ebook on how to make your very own Pong Clone using Unity. In this ebook, we will take you step by step through all the key mechanics need to build the basic game of Pong. Along the way, we will explain the purpose of each step and what is possible so you can better understand and learn how to make video games.
If you are not familiar with Pong and would to play it first you can play our version here
Preparation
Things you will need
Before we begin there are a few things you will need.
- Computer
- Internet connection
- Unity Hub
- Unity editor
If you are viewing this now then we can assume you already have a computer and an internet connection so you are already halfway there. I also assume you already have Unity Hub and a version of the Unity editor installed but if you don’t you can find our tutorial series on how to install Unity here
The version of Unity does not matter.
Once you have everything you need you will then need to create a new Unity project. You will want to use the 2D template. If you need help knowing how to create a new project follow this tutorial here
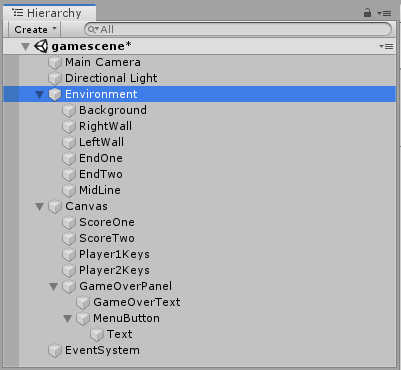
Once you have these images imported into your project we can then begin designing our scene. We have divided the game scene up into the following objects. (Click the links to see Inspector)
- : Your empty scene should already have a camera game object called Main Camera. Make sure this object has the following inspector
- Directional Light: This is another object that should already be in your empty scene. You don’t need to do anything with this object, in fact, you can just delete this object as we will only be using unlit sprites for this game.
- Environment: This is a new empty object with the following children
- : This is a sprite object with the black square sprite
- : This is an empty object with a 2D box collider
- LeftWall: This is the same as RightWall but with a negative X position.
- : This is similar to RightWall and LeftWall but the size of the box collider and position are different.
- EndTwo: This is the same as EndOne but the Y position is negative.
- : This is a sprite object with the dotted line sprite.
- : This is a UI canvas object with the following Canvas Scaler setting.
- : Is a UI text object anchored to the bottom of the canvas with a 0 for the Text field.
- ScoreTwo: This is the same a ScoreOne but it is anchored to the top of the canvas.
- : This is another text object anchored to the bottom. This has the following string for the Text field. “< A D >”
- Player2Keys: This is the same as Player1Keys but this object is anchored to the top of the canvas and has the following string for its Text field. “< J L >”
- : This is a UI Panel object that has its image transparency turned down to zero.
- : This is a UI Text object used for displaying the winner. The following string is the value of the Text field. “Player _ Wins”
- : This is a UI Button object.
- : This is the UI Text object that comes with the default UI Button.
- EventSystem: This is the Event System object that is created by default when you create a UI Canvas
Note: Do not forget the tags
Here is what your hierarchy should look like.
Here is what your Game View should look like.

Note: Once you have all this created you can then disable the GameOverPanel in your hierarchy.
At this point, you should have the environment for your game scene complete.
