Posted on

How To Create a Navigation Menu In Unity

Explanation Of The Project

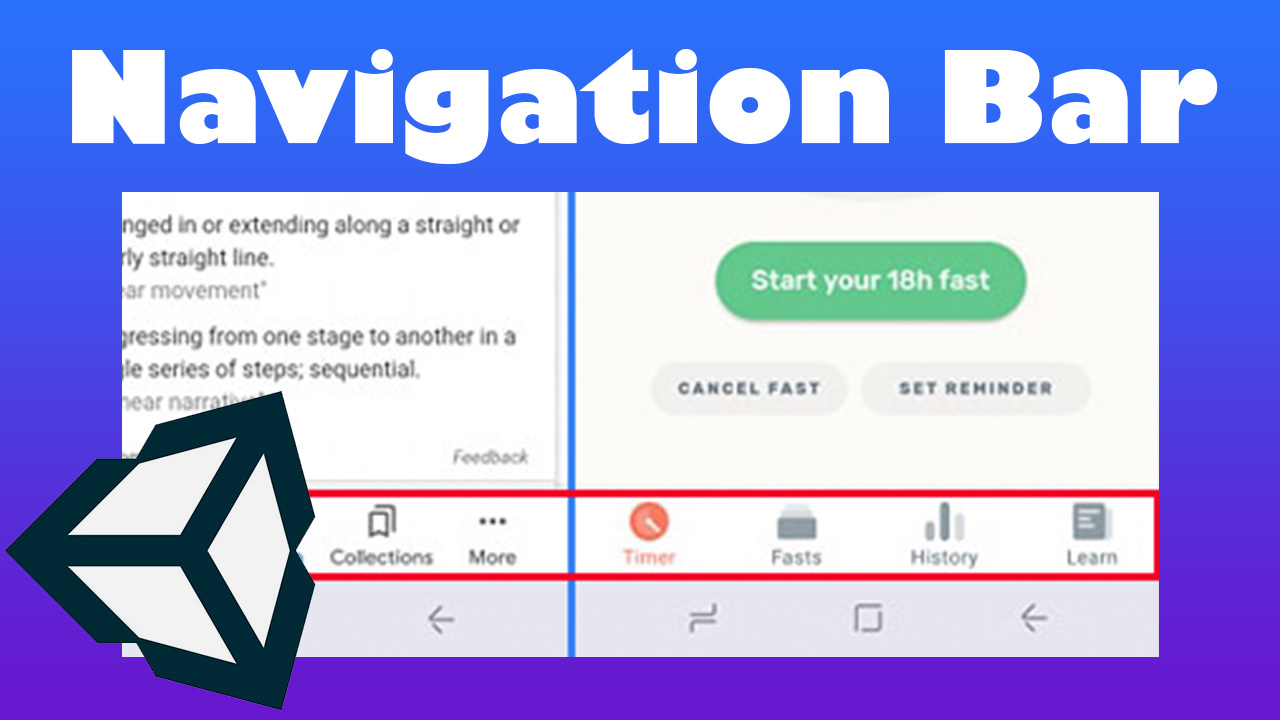
Let’s create a game menu with a navigation bar like google and app Zero. The main thing we will focus on in this post is getting the navigation bar setup with buttons to corresponding panels. The navigation bar on the app Zero has buttons labeled Timer, Fasts, History, Learn. Here is a picture of the Google and Zero app side by side with the navigation bar highlighted in red for reference:

Many other games and applications use this menu system for its minimal design, easy navigation, and easy setup. Some drawbacks are that the bar runs out of space quickly and double stacking the bar most of the time isn’t an option because of limited screen space.

Goals For This Lesson

  • Set panels to active/visible and nonactive/nonvisible with SetActive(True) or SetActive(False).
  • Creating a grid for an easier layout.
  • Condensing the code with an array and for loop.
  • Development for mobile.
  • In the next lesson, we will work on implementing some design and color/size-changing of the active icons.

Please Become A Member Today

Before we get started I always have to make a plug to join our membership at https://www.infogamerhub.com/memberships/ It helps us out a lot and we are adding new stuff all the time. We want to be able to help others out in the future with their coding and unity skills. There are many benefits to being a member and having the code being visible can be very useful.

[/wcm_nonmember]

Unlock Code and Member Content

Example 1 – “That’s alot of damage, I mean SetActives”

Example 2 – “Shortening it with an array and a forloop”

Video For This Lesson

Link to video: http://youtu.be/Rfv5M14ZoGY

Setting Up The Sprite Sheet With PhotoShop

This is a quick video on setting up your own sprite sheet with Photoshop. If you continue down the post there will be a sprite sheet for download for members only. We are adding to this sprite sheet over time so come back to download an updated sprite sheet in the future.

Link to video: http://youtu.be/wwMqn5LKDF8

Icon Sprite Sheet For Members Only

Next Lesson

The next lesson I was going to do was on how styling and adding icons with the color and size-changing effect on the navigation bar makes the project look more professional. If you want us to do a lesson on other menu setups and navigation bars let us know in the comments on the YouTube video for this post.

Posted on

3D Character Selection Menu

Unity Tutorial for Beginners

In this Unity tutorial for beginners, I will teach you how to create a very cool 3D character selection menu. This menu system uses 3D models of the character to display what the players are selecting. This tutorial for beginners will teach you about all different UI components and the code behind it.

Working in Unity

To begin we will start in Unity. You will need to have the 3D models that you want to be selectable. You need to have these 3D models in line with each other and make sure they are evenly spaced from one another. We will then create a World Space Canvas, scale it down and position and rotate so that it is floating above or in front of the 3D models. We will then create what is called a scrollrect or a scroll view. This is an image object the allows you to slide the UI objects that are children to the Scroll View. For the content of the Scrollrect we will have a UI image that overlaps the 3D models. We will then create UI buttons, one for each Character, and place the buttons over top of each 3D model. The last thing that we need to do is make our character models children to our content object.

Coding a Selection Menu

Now that we have Unity all set up for this tutorial we will talk about the code. We will need two scripts for this Game mechanic. The first will be called the StoreController and the other will be call StoreButton. In the store controller script, we will create code that will lerp our content object to a new position vector3 variable. In the StoreButton script, we will create two functions one that will set an int variable that we can then later use to instantiate the right character model for our player in the multiplayer scene. The second function will be for measuring the distance between the button selected and the center of our scrollrect. We will then use this distance to set the new position variable of our StoreController script.

More Unity

Once back in Unity we will need to apply these scripts. The StoreController script can be attached to our scroll view object and our StoreButton script can be attached to each of the buttons. We then need to set our variable and apply the functions of our StoreButton scripts to the On Click events of our UI buttons.

Test the Game

Finally, we can test our game. You should be able to scroll all your character to the left and right and you should be able to click on each character which will center them in our scene.